Approving a Promotion
An RFP is first submitted for promotion which prepares the source and objects for deployment in a temporary library. If there are no errors, the installation process checks the Promotion Level parameters and if the Automatic RFP Approval flag is set to 'N' or 'T', or the RFP contains attributes that require approval, the RFP status is set to '02' - Approval Pending. An authorized user or users must then approve the promotion before it can be installed. To do this, toggle to the Approve list using F8 in the RFP Manager.
The list of all RFPs in status 02 are displayed.
Enter a '1' for an RFP number to approve it.
Enter a '7' to remove the temporary promotion library and to set the RFP back to status '01'.
If approval could be completed and the auto-install flag is set to 'Y' for the promotion level, then a confirmation screen will be displayed for the submission of the installation of the promotion.
Manual Approval
A single user can approve the RFP.
The user must have authority to MDSEC code 42 for the application if the RFP was submitted by someone else.
The user must have authority to MDSEC code 52 for the application if the RFP was submitted by that same user.
Template Approval
One user per Approval Group required for the RFP will need to approve the RFP for Installation. The required Approval Groups are determined by the Object Approval Templates that the RFP's objects are assigned to. Once the status for each group is set to approved, then the RFP will be transitioned to status 03=Ready for Installation.
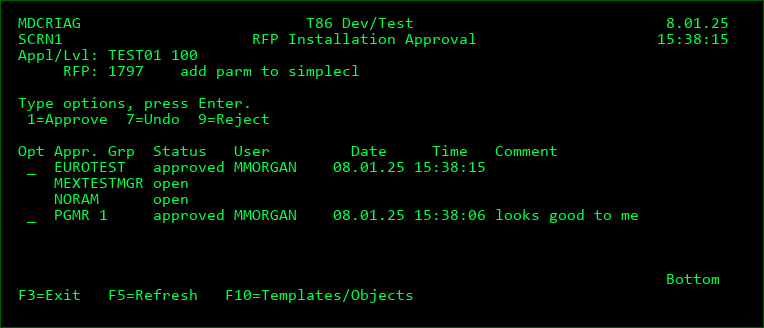
You will have a prompt to Approve, Reject or Undo for each Approval Group that you belong to.
Options
1 - set the status to approved for the selected Approval Group. A confirmation screen will be displayed where a comment can also be optionally provided.
7 - undo the approved or rejected status for the selected Approval Group. The undo occurs without a confirmation screen.
9 - set the status to rejected for the selected Approval Group. A confirmation screen will be displayed where a comment can also be optionally provided.
Function Keys
F3=Exit - exit the screen
F5=Refresh - refresh the listing
F10=Templates/Objects - view the list of all Objects and Object Approval Templates that combined to determine the list of required Approval Groups.