Project Details
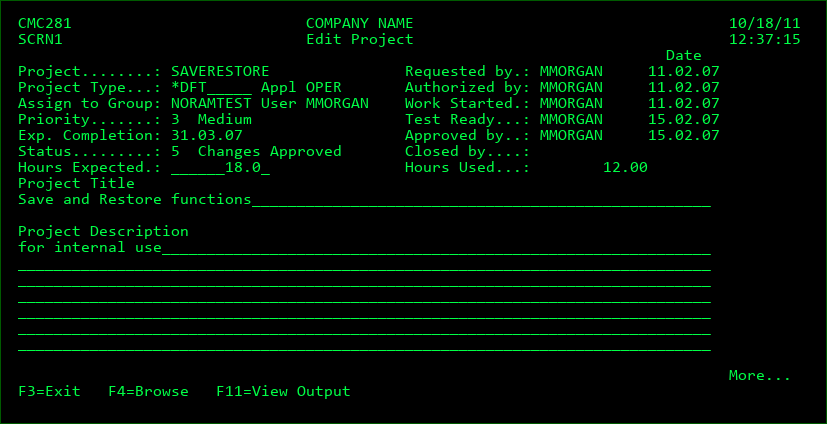
All Project information available within the 5250 client can be displayed or edited from this screen.
The Project Listing display is accessed by pressing F4 from the Object Manager when the cursor is on a Project field or via option 6 from the MDCMS Main Menu.
NOTE: Not all functions of the Project Management system are available within the 5250 UI. Refer to the MDWorkflow web application documentation for those features only available within MDWorkflow or MDOpen.
Project
A 12-character field to uniquely identify the project
Project Type
The type of project, in order to categorize it and to apply pre-defined rules, custom fields and status codes for the project (if MDWorkflow is used). Press F4 on the Project Type field to manage the Project Types.
Appl
The primary application that the project will be used for. This is an optional field and if an application code is entered, requests for objects in other applications may still be assigned to this application.
Assigned to Group
The primary MDWorkflow Group that has been assigned to perform the work for this project. This screen only displays the primary value for this field. Use option G=Groups to view/manage all groups for the project.
User
The primary programmer to perform the work for this project. This is an optional field and other programmers may also perform work for the project, if the project type allows for it.
Priority
1 - Critical
2 - High
3 - Medium
4 - Low
5 - Optional
Exp. Completion
The date the project is expected to be complete
Status
1 - Project Opened
2 - Project Authorized
3 - Work in Process
4 - Ready for Testing
5 - Changes Approved
6 - Project Complete
9 - Project Cancelled
If the MDWorkflow license is active, additional status codes may be created and used.
Requested by
Authorized by
Work Started
Test Ready
Approved by
Closed by
For all these fields it will list the User that set each status and the date that the status was set.
Hours Expected
The number of hours that are expected to be needed to complete the project.
Hours Used
The sum of all hours entered to date for the project.
Project Title
A brief description of the Project.
Project Description
A full description of the Project.
Function Keys:
F3=Exit
F4=Browse - Browse list of valid values for available fields.
F11=View Output - Display the MD Output panel and other spool files
Project Types
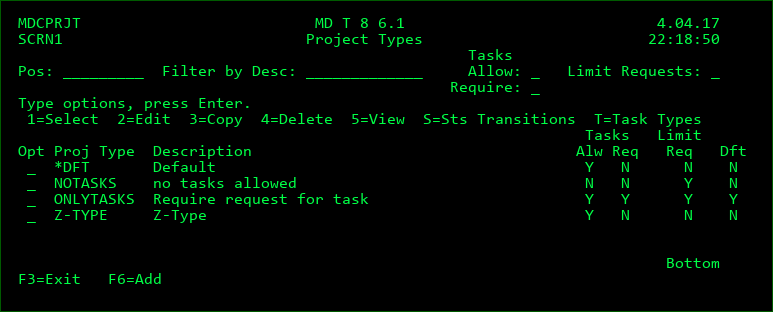
Project Types are means to categorize projects and to set certain rules for projects of a given type. Every project must have a Project Type defined for it.
The listing to view and manage project types is reached by pressing F4 on the Project Type field in the Project screen.
Project Type
A 10-character identifier for a type of project
Description
Description of the Project Type
Allow Tasks
If Tasks are allowed to exist for this Project Type
Y - Tasks may be created
N - Tasks are not allowed. All work must be performed at the Project level
Require Requests be assigned to Tasks
If objects can be deployed directly for a Project, or if a Task must exist and applied to any checkouts before the RFP can be processed.
Y - Tasks must be created and assigned to every Object Request assigned to a project of this type prior to submission. Allow Tasks must also be set to Y if this flag is set to Y.
N - Object Requests are allowed to be assigned directly to the Project.
Limit Object Requests to Assigned Users
If developers are limited from assigning Object Requests to a Project of this type.
Y - Only developers that have been assigned to the Project, either directly or as a member of an assigned group, are allowed to assign Object Requests to the Project.
N - Any developer can assign Object Requests to a Project of this type.
Default Project Type
If the project type should be used as the default value when the user selects to create a new project.
Y - The Project Type should be used as the default for new projects. Only one Project Type can be the default. The user can overwrite the value with a different project type.
N - Not the default project type
Options
2=Edit - change the type properties
3=Copy - copy to a new type
4=Delete - remove the type
S=Sts Transitions - specify the allowed Project Status Transitions permitted for the Project Type
T=Task Types - specify the Task Types that can be used by Tasks or Subtasks by a Project of the Project Type
Project Groups
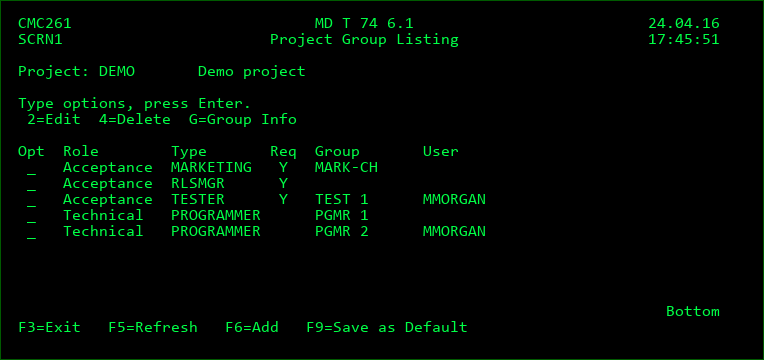
If a valid MDWorkflow license exists for the partition, option G can be used from Project Listing to view/manage all acceptance and technical groups for a project.
Role
A - Acceptance/Test - The role is used to perform acceptance testing on RFPs that impact the project once the RFP is installed for a level requiring MDWorkflow acceptance before the RFP can continue to the next step in the migration path.
T - Technical - The role is used to carry out work on behalf of the project.
Type
The User Group Type assigned to the role
Req
Whether or not the Group Type is required for the Project in order to be able to deploy an RFP all the way to production.
Group
A user group of the given group type. A group is mandatory for an Acceptance role entry, but is optional for technical roles.
Multiple user groups can be added to a project for the same group type. During RFP acceptance, members of any included group for same project can accept or reject an RFP.
User
If the group is blank, any user registered in MDSEC can be added to a project for a technical role.
If the group is entered, the user field can be blank to mean that any member of the group can be involved with the project. Otherwise, the user must belong to the group and then the project is intended for that specific user.
Multiple entries of specific users can be added for the same user group to a project.
Options
2=Edit - change the group or user for a group type entry
4=Delete - remove a group or user from the project
G=Group Info - Display the User Group listing positioned to the entry selected
Function Keys:
F3=Exit
F5=Refresh
F6=Add - Add a group and/or user to the project
F9=Save as Default - Save the current list of groups and users to your profile. When you create a new project, the list will automatically be applied to that project.
Project/Task Status Codes
The list of valid Status codes for Projects and Tasks can be viewed by pressing F4 on the Status filter in the Project and Task list views or by pressing F4 on the Status field in the Project and Task detail views.
If a valid MDWorkflow license exists for the partition, additional Status codes can be created and status behaviour can be modified.
Status Code
A one-character unique code for the status
Sort Sequence
The order of the code in the list. Any active status must have a sort sequence < 800 and any closed status must have a sort sequence >= 800.
The sort sequence is also important when defining status ranges for custom fields or status boundaries.
Description
A description of the status code
Use in Projects
Y - the status can be applied to a project
N - the status can't be applied to a project
Use in Tasks
Y - the status can be applied to a task or subtask
N - the status can't be applied to a task or subtask
Ending Status
Y - the status indicates that the project or task is closed. No further work is allowed when ended.
N - the status indicates that the project or task is still ongoing.
Allow Auto-Update
Y - Automated commands are permitted to update a project or task to this status. The commands that apply are:
MDUPDPROJ
MDUPDSTS
MDUPDTASK
N - this status can't be automatically applied to a project or task
Allow Man.-Update
Y - Authorized users are permitted to update a project or task to this status via the MDCMS, MDOpen or MDWorkflow views.
N - this status can't be manually applied to a project or task
Manual Group Type
If entered, limit the users that can manually set this status to members of a group of the given type that is involved with the project or task.
Options
2=Edit - change the status properties
3=Copy - copy the properties of an existing status to a new status code
4=Delete - delete a status code - only allowed for custom status codes
T=Transitions - manage the list of status codes from which the project or task can transition to this status. See Section Project/Task Status Transitions for more information.
Function Keys:
F3=Exit
F5=Refresh
F6=Add - Add a new status code
F8=Sort by Code/Seq - Toggle the listing to be ordered by Code or Sort Sequence
F9=Boundaries - Limit when an RFP can be processed based on the status of the Projects or Tasks that are impacted by the RFP. See Section Project/Task Status Boundaries per Level for more information.
F10=Triggers - Automatically initiate the submit, approve, install or send of RFPs for a Project or Task when the status of the Project or Task changes. See Section Project/Task Status Triggers per Level for more information.
Project/Task Status Transitions
By default, every status can transition to every other status for any given Project or Task Type, assuming authority, activity and mandatory field entry is otherwise in a permissible state.
However, for each Project Type and Task Type, the workflow of the projects, tasks and subtasks can be controlled by limiting which status codes can transition to other status codes.
For example, you may wish to have all tasks of type ABC limited to the following flow:
1-Opened
-> 2-Authorized
-> 3-Work in Progress ->
4->Ready to Test
-> Testing Complete or E-Errors found during Testing or 3-Work in Progress
-> 7-Closed
This can be done from the Status Transitions screen, which is accessible with option T from the Project Type or Task Type listings.
NOTE: a valid MDWorkflow license must exist for the partition to define Status Transitions.
Options
F=Codes to Transition from - specify which status codes can transition to the selected status
T=Codes to Transition to - specify the list of valid status codes values to change to from the selected status
Project/Task Status Boundaries per Level
Barriers can be put in place to limit when an RFP can be processed based on the status of the Projects or Tasks that are impacted by the RFP. The list of defined Boundaries can be viewed/managed by pressing F9 in the Project/Task Status Codes list.
NOTE: a valid MDWorkflow license must exist for the partition to define Status Boundaries.
Boundaries are checked when a submit, approve, install or send action is requested for an RFP. MDCMS then checks if a Boundary definition exists for that action for the level of the RFP.
If found, MDCMS verifies if the status of each Project or Task or Subtask impacted by the RFP is within the permitted range defined by the Boundary.
The status is checked for the lowest element assigned to each object in the RFP.
For example, if object ABC is assigned directly to a Project, then the Project Status is checked. If object XYZ is assigned to a Project Task, then the Task Status is checked, but the Project Status is ignored.
If at least one of the impacted projects or tasks have a status outside the allowed range, then the requested action will be denied.
Application
The target application of the RFP
Level
The application level of the RFP
RFP Action
1 - when an RFP is submitted for validation and building of the deployment package
2 - when an RFP is approved
3 - when an RFP is installed
4 - when an RFP is sent to a target location
Minimum Status
A valid status code that marks the minimum boundary of the range based on the sort sequence of the code. If blank, then any status below the maximum is allowed.
Maximum Status
A valid status code that marks the maximum boundary of the range based on the sort sequence of the code. If blank, then any status above the minimum is allowed.
Options
2=Edit - change the boundary
3=Copy - copy the properties of an existing boundary to a new boundary
4=Delete - delete a boundary
Function Keys:
F3=Exit
F6=Add - Add a boundary
Project/Task Status Triggers per Level
Triggers can be put in place to automatically initiate the submit, approve, install or send of RFPs for a Project or Task when the status of the Project or Task changes. The list of defined Triggers can be viewed/managed by pressing F10 in the Project/Task Status Codes list.
NOTE: a valid MDWorkflow license must exist for the partition to define Status Triggers.
Triggers are checked whenever a status changes for a Project, Task or Subtask.
Application
The target application of the RFP
Level
The application level of the RFP
RFP Action
1 - when an RFP is submitted for validation and building of the deployment package
2 - when an RFP is approved
3 - when an RFP is installed
4 - when an RFP is sent to a target location
New Status
The new status value that has just been transitioned to
From Status
The prior value of the status. Leave blank to trigger the action when transitioning from any status to the new status. Otherwise, enter a value to limit the transitions causing the trigger. A Trigger record can be created for each transition if multiple from values, but not all from values, are necessary.
Project Trigger
Y - trigger the action when the status was changed on a project
N - not applicable at the project level
Task Trigger
Y - trigger the action when the status was changed on a task
N - not applicable at the task level
Subtask Trigger
Y - trigger the action when the status was changed on a subtask
N - not applicable at the subtask level
Merge RFPs
This parameter is considered for the RFP Submit and Send actions
Y - if multiple RFPs containing the Project, Task or Subtask are ready to be submitted or sent, merge them into a single RFP prior to triggering the action.
N - submit or send each RFP separately
Submit Immed
This parameter is considered for the RFP Submit and Install actions
Y - submit the RFP to the job queue immediately for processing
N - place the RFP in pending status, to be picked up at the appropriate time by the MDSBMRFP or MDINSRFP commands.
Options
2=Edit - change the trigger
3=Copy - copy the properties of an existing trigger to a new trigger
4=Delete - delete a trigger
5=View - view the parameters of a trigger
Function Keys:
F3=Exit
F6=Add - Add a boundary