Requesting a change to an Object
M - Modify Object
The 'M' option is a request to modify an existing object. If the request is successful, MDCMS will copy the requested source to a development library and create a Request record in Lock Mode.
The Object Selection Process
position cursor to a blank line in the object manager
Enter the name of the object or press F4 to select object from list. A portion of the object name may be entered before pressing F4 to position the cursor to that name in the list.
It is permitted to select multiple objects from the list. If more than 1 object is selected, each additional selection will be placed on its own new row within the Object Manager listing and the option, application and RFP for the initial row will be replicated to the additional rows for rapid check-out of multiple objects.
Enter the name of the MDCMS attribute or press F4 to select the attribute from list. If left blank, the default value entered at the top of the screen will be used. If this value is also blank, MDCMS will use the attribute that was used for the object the last time that the object was installed. The attribute specifies the location of the source and object as well as how the source is compiled and which authorities are assigned to the object.
Enter the name of the application in which the object exists or press F4 to select the application from list. If left blank, the default value entered at the top of the screen will be used.
Enter the Level number for the application or press F4 to select the level from a list. If left blank, the default value entered at the top of the screen will be used. If this is also blank, then the lowest level for the application will be used.
Enter the Project ID or press F4 to select the Project, Task or Subtask from the Project Listing panel. If left blank, the default value entered at the top of the screen for Project, Task and Subtask will be used. It is not required that a Project is selected at request time. More than 1 Project may be selected for the same object request.
Enter the RFP number or press F4 to select the RFP from list. If left blank, the default value entered at the top of the screen will be used. It is not required that a RFP is selected at request time.
Press Enter.
MDCMS checks to see if another user already has the object requested. If so, the newly entered request is declined and a screen is displayed which shows all relevant information pertaining to the existing request. From the screen, the user has the option to press F10 in order to request the object in Unlock Mode.
MDCMS will select the default library/folder to copy the existing source or object from based on the following priority:
- The primary library/folder for the target level
- The chain of levels above the target level based on the next level parameter on level definition.
- The chain of based on levels for the target level, if the target level is based on another level for managing parallel versions of an application.
- The search template definition for the attribute.
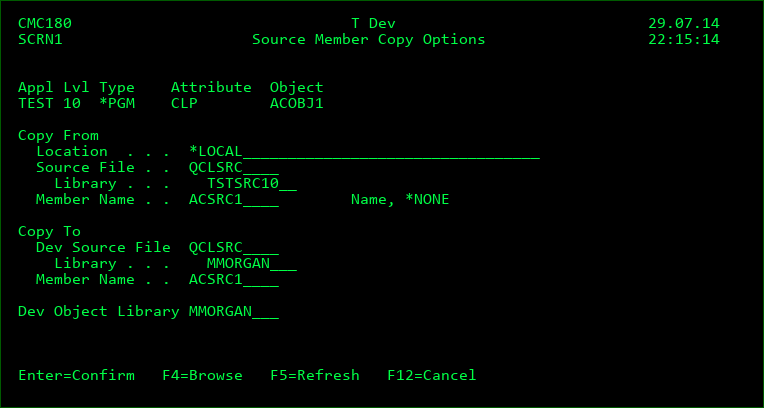
This screen is then displayed where the user chooses where to copy the source from and where to copy the source to. Modifications are then made to the copy of the source, rather than the original source to protect the installed version of the source.
If the source already exists in the programmer's library, the programmer will be prompted as to whether or not the existing source should be overwritten.
If the library or source file does not yet exist in the programmer's library, the programmer will be prompted to create them.
The name of the source can differ from the name of the object and the source library may be different than the object library.
Source Comparison
If Source Comparison Checking is defined for the application level in the OS/400 Location settings (MDCMS Settings Menu Option 8), then the version of the source that is to be copied into the programmer's library will be compared with the version of the source that is residing in the comparison level on the local or a remote system.
If the versions are different, a warning screen will be displayed to the programmer. F8 can be pressed to view the differences in the 2 versions of the source code. If the programmer has authority to request source from a different location (MDSEC Code 33 for the application), the programmer then has the option of copying the remote version of the source rather than the local source.
If the versions are different and the programmer that made the prior change to the source is different than the current programmer, the current programmer can only check out the source if they have authority to change programmer for object request (MDSEC Code 32).
Emergency Checkout Warning
If the Object was most recently checked out for deployment to an Emergency level, and the new request is for a standard level, a warning screen will be displayed to the programmer informing them of the level, user and Project involved in order to help resolve the merging of the changes made for the emergency deployment.
Location Warning
When requesting source or objects, MDCMS can be configured to automatically notify the user if the source or object is found in specific locations. This can be helpful to make the user aware of potential conflicting versions of the object, such as in vendor libraries. To automatically search and notify, apply search templates with the libraries to be checked to the attributes to be monitored.
N - New Object
This option is used to reserve an object name. The steps followed are identical to those for the modification of an object. The new object name may not already exist in the destination library for the attribute. If for new source, the user is then prompted for an existing source to copy from (as a template). The copy is optional.
If an existing source member is copied to a new member, or if the copy from value of *GEN is used to generate a new source member in the programmer library, the programmer is then prompted to provide the source attribute and description of the new member.
If the member to copy from doesn't exist in the default source library, F16 can be pressed to have MDCMS search for the source in the level chain and based on levels.
D - Delete Object
This option is used to delete an object and the source for the object. The steps followed are identical to those for the modification of an object. When the promotion occurs that causes the deletion, the source or object is archived prior to deletion (if archiving is turned on for the level.) Any cross-reference information about the object is also removed at promotion time.
To delete an IFS file or directory, enter the attribute for the IFS entity before pressing F4 to select it from a list. If a directory is selected, and that directory contains files or sub-directories, MDCMS will automatically create deletion reservations for those entities too.
R - Recompile Existing Object
This option is used to recompile an object into a target level. The recompile option can be used for objects that include a source library/folder on the target level's attribute or for ILE programs/service programs to refresh the bindings for modified modules or service programs.
If recompiling from source, the source used to compile from will be determined based on the search priority below. If recompiling ILE from a list of bindings, the program containing the bindings will be determined by the search priority below:
- The primary library/folder for the target level
- The chain of levels above the target level based on the next level parameter on level definition.
- The chain of based on levels for the target level, if the target level is based on another level for managing parallel versions of an application.
- The search template definition for the attribute.
An object can be requested for recompile even when a locked request already exists for the target level. The steps followed are otherwise identical to those for the modification of an object.
If multiple objects of different names share the same source, the initial object can be checked out as Modify and the other objects can be checked out as Recompile and then placed on the same RFP. The modify request should be set to be sorted first among the group of objects sharing the same source in the RFP.
U - Update Existing Object
This option is used to update an existing object without modifying any source or migrating the Object from a lower level. An Update command must be defined for the object or attribute. Examples of an Update command would be the UPDPGM command for updating existing ILE programs, CHGPF for updating an existing DDS table, or RUNSQLSTM for an ALTER script for an existing SQL table. The Update option may be requested even when work is in progress for the source or object. The steps followed are otherwise identical to those for the modification of an object.
- *** NOTE - for ILE/Service Programs, it is recommended to instead use the recompile option for ease of use.
- *** Generally, for tables, it is recommended to use the modify option instead of the update option for better rollback capabilities. However, if an update is used in conjunction with MDRapid, the update will occur in a copy of the file and then that will be moved to the live library at installation time to limit application downtime and provide full rollback capabilities. By default, updates don't utilize MDRapid, but this can be enabled by editing the object request and specifying *YES for parameter Use MDRapid.
L - Library Migration
Often, a temporary library will be sent from a vendor (or some other source) with the intent that the objects in this library are to be migrated into your application. The 'L' option can be used to easily request the objects for migration.
To do this, enter the name of the library at the object prompt. Also enter the Application code. Leave the attribute field blank. Press Enter. A list of all objects in the library is then displayed.
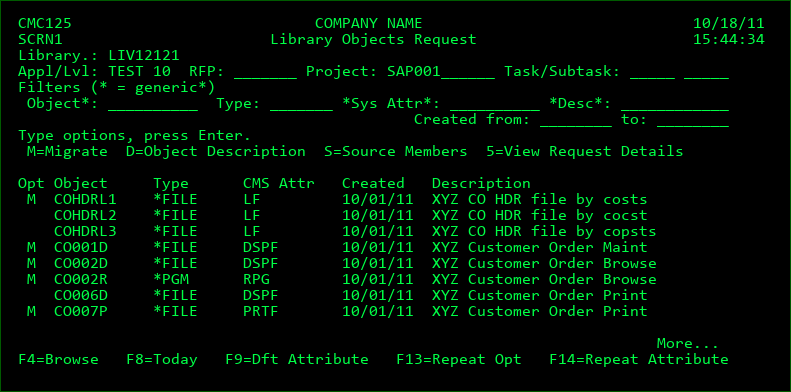
This display lists all objects that exist in the library.
RFP
The RFP number to assign to the selected objects in the library. Press F4 to create a new RFP and/or select an RFP from the list of open RFPs.
Project/Task/Subtask
The Project ID to assign to the selected objects in the library. Press F4 to create a new Project and/or select a Project from the list of open Projects. If the assignment needs to be for a task or subtask within the Project, those values can be entered as well.
Filters
The list of objects may be filtered by Object, Type, System Attribute, Description or range of Creation Dates.
The object name filter value can use the suffix * to filter the objects based on the value preceeding the *. The system attribute and description filters allow the * wildcard before and after the generic value.
The filters are not case sensitive.
Opt
M=Migrate - Migrate the object from the selected library into the lowest application level on the system. A request will then be created for that object. The request can then be handled like all other requests in the Object Manager.
D=Object Description - Display the object description using the IBM Display Object Description command(DSPOBJD) using a Detail parameter value of *FULL. The information on the Display Object Description panel can aid in analysing objects prior to migration.
S=Source Members - View the list of source members in a source file. This option is only valid for source files. The members may then be individually requested.
5=View Request Details - View the details of an already requested object.
Attribute
MDCMS makes a best guess as to what the attribute should be. Enter a different value or press F4 to select from list, if necessary.
Function Keys:
F4=Browse - Display list of valid values for a field.
F8=Today - Creates a filtered view of all objects that were created with today's date.
F9=Dft Attribute - Set default Attribute to be used for new objects with same system attribute.
F13=Repeat Opt - Repeat an option until end of list. For example, if 'M' was entered on the 4th line of the list and F13 was then pressed, lines 5 through the end would also have 'M' entered.
F14=Repeat Attribute - Repeat an attribute. Place cursor on line for attribute to be repeated and press F14. For every object with a matching object type, this attribute will be inserted.
L - IFS Directory Migration
Option L can also be used to migrate files or entire directories that exist in IFS.
To specify a Directory Migration rather than a Library Migration, place a "/" at the beginning of Object field before pressing Enter.
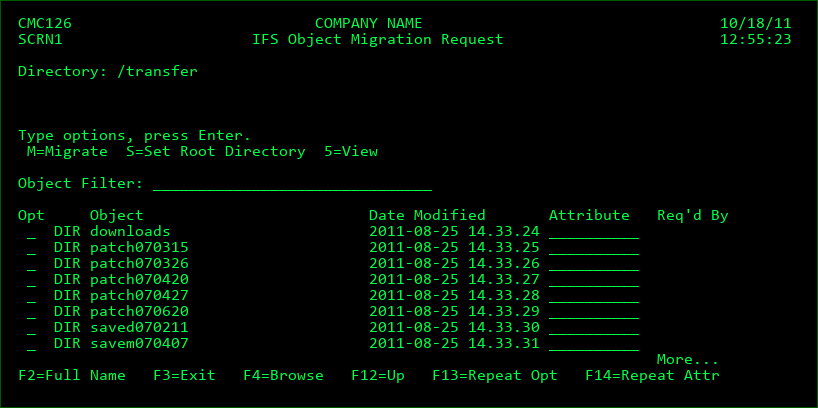
This display lists all sub-directories and files that exist in a specified directory.
Object Filter
The list of objects may be filtered by object name. All values are interpreted as generic strings. For example, enter TCH in the object filter to see all objects with tch somewhere in the name. The filter is not case sensitive.
OPT
M - Migrate the object from the specified directory into the lowest application level on the system. A request will then be created for that object. The request can then be handled like all other requests in the Object Manager. If the object is a directory, and the directory contains files or sub-directories, you will be prompted with the choice to automatically migrate all files and/or directories as well. You can also limit the migration to include only directories/files that have been modified since a specific date/time.
S - Set the Root Directory for the Migration. Afterwards, you can use option 5 to drill down into the directory and its sub-directories and select to migrate specific files or directories, while retaining the path starting with the root directory.
For example: an Attribute is defined that specifies that an IFS object is to be installed into directory /tomcat. You could then use option S to set the root directory for the migration as directory webapps, which resides in directory /delivery. Afterwards, option 5 is used to select a file in directory /delivery/webapps. When the file is migrated, it will be moved from directory /delivery/webapps to directory /tomcat/webapps. This way, you only need to create an attribute for the uppermost directory of commonly changed objects in IFS.
5 - If the object is a file, then the contents of the file will be displayed. If the object is a directory, then this display will change to show all objects residing in the directory.
Attribute
MDCMS makes a best guess as to what the attribute should be. Enter a different value or press F4 to select from a list of IFS attributes, if necessary. If a Root Directory has been set, then the Attribute for the Root Directory will be used.
Function Keys:
F2=Full Name - Display the full name of an IFS Object or Directory. Place the cursor on the field before pressing F2.
F12=Up - Go up 1 directory in the path. If the currently displayed path is /, then MDCMS returns to the Object Manager.
F13=Repeat Opt - Repeat an option until end of list. For example, if 'M' was entered on the 4th line of the list and F13 was then pressed, lines 5 through the end would also have 'M' entered.
F14=Repeat Attr - Repeat an attribute. Place cursor on line for attribute to be repeated and press F14. For every object with a matching object type, this attribute will be inserted.
Y - Synon/2E Migration
If MDCMS is configured to migrate objects from Synon/2E models, Option Y will appear that can be used to select the Model objects for migration.
See the PDF document MDCMS_SYNON-2E_Interface_Manual for further information and instructions.
Request Linked Objects for Attribute
If the object just requested was for an attribute that contains Linked Checkout definitions, then MDCMS will automatically present a list of linked objects to be considered for checkout.
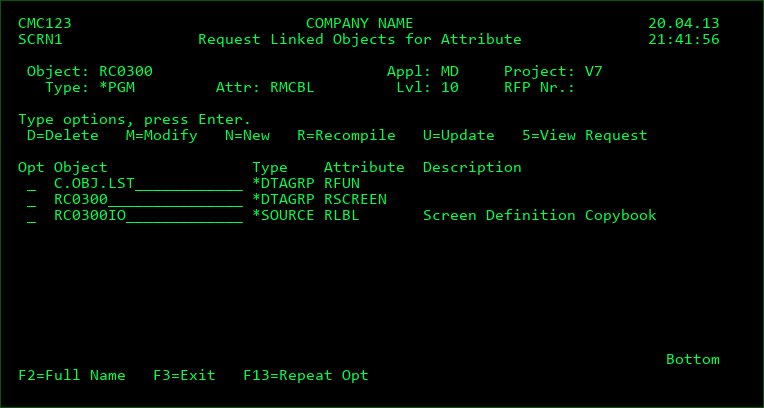
Opt
D=Delete - Create a Request to delete the Object
M=Modify - Create a Request to modify an existing object
N=New - Create a Request to create a new object
R=Recompile - Create a Request to recompile an existing object
U=Update - Create a Request to update an existing object
5=View Request - View the details of an already requested object.
Object
MDCMS automatically generates the name of the linked object, based on the name of the parent object in combination with the Naming Pattern definition for the linked attribute. The object names can be modified before pressing Enter to request them.
Function Keys:
F2=Full Name - Place cursor on an Object field and press F2 to view/edit the complete value
F13=Repeat Opt - Repeat an option until end of list. Place cursor on line for option to be repeated (including a blank option) and press F13. Every line after the line containing the cursor will receive the same option.