Send Promotion Display
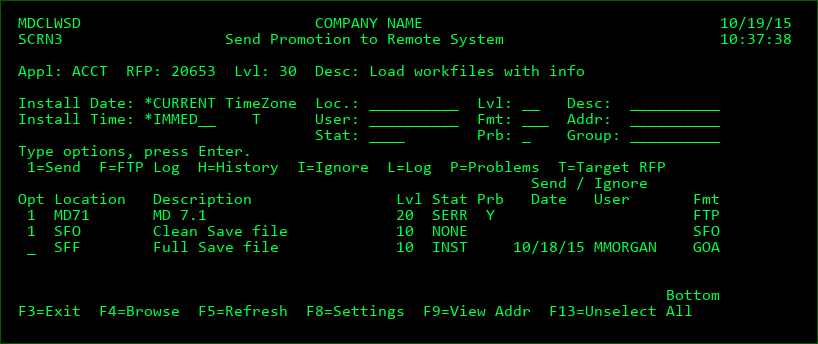
This is the confirmation screen for sending a promotion to one or more remote systems. This panel appears when option 1=Send or T=Target Locs is selected for an RFP on the Send Promotion to Remote System panel or from RFP History.
Install Date
The date that the install should take place on the target systems.
Set this value prior to using option 1 to process the send to the systems that should be installed at that time.
If the target level is set to automatic, it will be received, submitted and approved for installation immediately on the target system. Then a 2nd batch job will be submitted to batch that will be scheduled for the date/time provided.
If the target level is set to manual, then a user will need to carry out the manual steps, but the install date/time will default to the value provided in this screen.
*CURRENT - the installation will be scheduled for the same day that the submission completes on the target system.
Install Time
The time that the install should take place on the target systems.
*IMMED - the installation will begin as soon as installation approval is complete on the target system.
TimeZone
Indication of which location the entered Install Date/Time refers to.
L - schedule the date/time based on the time zone of the local (sending) system. If the target system is in a different time zone, the scheduled date/time will be adjusted accordingly. So, if the RFP is scheduled to install at 9pm EST because the local system is in New York, it will be installed at 6pm PST if the target system is in Los Angeles.
T - schedule the date/time based on the time zone of the target system. The scheduled date/time used on the SBMJOB command will match the value entered exactly. So, if the RFP is sent to 3 different locations and scheduled for 9pm, it will install at 9pm of the time zone of each of those systems.
Loc
Filter by the Location ID of the target system. Press F4 to select from a list.
User
Filter by the User ID that sent the RFP or Ignored a Location. Press F4 to select from a list.
Stat
Filter by the Status of the distribution for a Location. Press F4 to select from a list. The full description of possible status codes is available in section Send Status Values.
Lvl
Filter by the Level on the target system
Fmt
Filter by the Distribution Method. Press F4 to select from a list.
Prb
Whether or not problems have occurred during the send, receive or install of the RFP for the target level. Use Y to filter to only targets where problems occurred. Use N to filter to only targets where problems haven't occurred.
Desc
Filter by the Location Description. Any row will be displayed that contains the value anywhere within the description for its location.
Addr
Filter by the Location Address. Any row will be displayed that contains the value anywhere within the target address for its location.
Group
Filter by a Location Group. Press F4 when cursor is on the Group field to select and manage the Location Groups. Location Groups are used to provide a means of filtering a list of Locations by any definition necessary for the organization. Multiple locations can belong to a location group and multiple location groups can contain the same location.
Options
1 - Send the RFP to one or more target locations
F - View the FTP Log for the most recent attempt of sending by FTP to the selected location
H - View the Send History for the selected location
I - Ignore the target level for this RFP. If ignored, the auto-close function won't consider this level and will proceed with closing the RFP once the other default levels have been processed or ignored. The authority to ignore a target level is based on MDSEC function code 54.
L - view all steps that have occurred during the most recent Send Batch for the RFP and specific target level. For each step, the job log entries can be viewed for additional information. The steps, the job log, or a combination of both can be exported to an excel report. To view the log entries for older batches, use the Log option from Send History (F10 from Send Listing). The job log entries are applied to the RFP using the MDLOG service. If the entries are missing, ensure that the MDLOG service is running.
P - View a list of any problems that have occurred during the send, receive or install of the RFP
T - Once the RFP has been received on the target system, option T can be used to view details about the target RFP. If authorized on the target system, the target RFP can also be approved for installation or installed from this screen. A pre-requisite to use this option is that a DDM connection is defined in MDCMS and MDPUSH or MDPULL is used to sync data between locations. In order to approve or install remotely, the sending location must be defined as a MDWorkflow Repository both locally and on the target location.
Special Funtion Keys
F8 - View/Manage the Distribution Level settings
F9 - toggle the listing between viewing the location description and the target address
F13 - select or unselect all rows with option 1=Send