Use MDRapid
Create Object Requests
The product is available from a 5250 command line using command MDCMS.
It is also available from:
- the MDOpen extension for VS Code
- the MDOpen perspective for Rational Developer for I
- MDOpen for Web
The instructions below are specifically for the green screen client, but the concepts are the same in the MDOpen clients. MDOpen-specific instructions are available in the MDOpen User Manuals.
Initial Steps to Create an Object Request
-
Once in the MDCMS Main Menu, use option 2 to navigate to the Object Manager
-
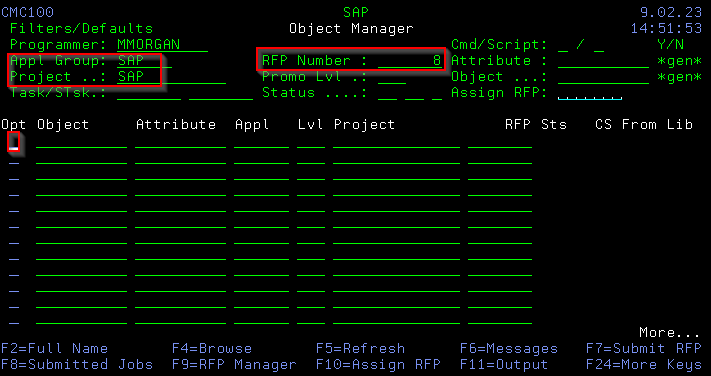
At the top-left of the screen, set the Appl Group filter to the application code for the environment. If the SAPLIB parameter was used, the application will already be defined as SAP. Otherwise, enter the value or press F4 to select from a list.
-
Position the cursor to the RFP Number field and press F4 to select from a list. The list will show all open RFPs. An RFP represents an installation package and all object requests for the same RFP number will be installed together. Press F6 to add a new RFP. Only a description for the RFP will need to be entered. The rest of the values should be fine as is. Once a number is generated, select it using option 1. If you are unable to create an RFP, then you don’t have sufficient authority in MDSEC. See the MDSEC User Manual for more information.
-
Position the cursor to the Project field and press F4 to select from a list. If the SAPLIB parameter was used, the project will already be defined as SAP. Otherwise, select the correct project or press F6 to create a project. Further instructions about projects can be found in the MDCMS User Manual.
-
Position the cursor to the Opt field of the first empty row in the list
Object Request Options for MDRapid
Option M=Modify Object
Use option M if you will be modifying the SQL script containing the CREATE TABLE statement for a table or modifying the DDS source member for a physical file. This is typically done to add/change/remove fields or keys. MDCMS will then create the *FILE object from the source code and MDRapid will copy the data from the live version of the table to the newly created version.
Prerequisites for using Option M
- Your MDCMS core license includes at least one developer
- You have authority to MDSEC Function Code 28 for the target Promotion Level
- You have defined the location of the source code for the MDCMS Attribute
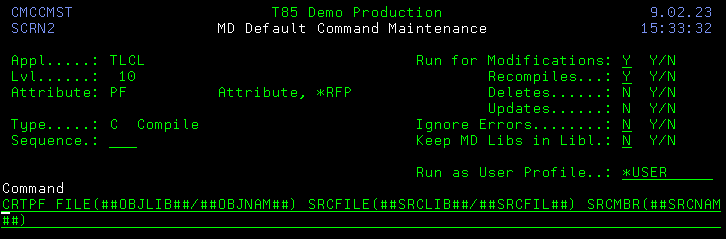
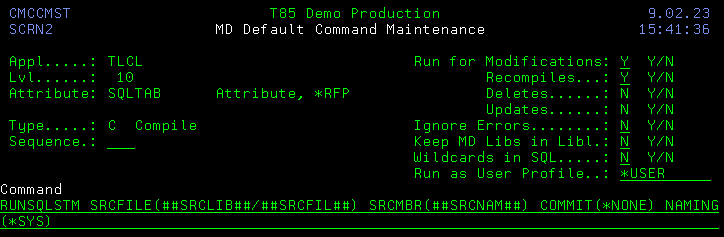
- You have defined the Compile command for the MDCMS Attribute
Example Compile command for a PF Attribute:
Example Compile command for a SQLTAB Attribute:
Option R=Recompile Object
Use option R if you have the SQL script containing the CREATE TABLE statement for a table or have the DDS source member for a physical file, but will not be making any changes to the source. This is typically done to pick up changes in a reference file. MDCMS will then create the *FILE object from the source code and MDRapid will copy the data from the live version of the table to the newly created version.
Prerequisites for using Option R
- You have authority to MDSEC Function Code 30 for the target Promotion Level
- You have defined the location of the source code for the MDCMS Attribute
- You have defined the Compile command for the MDCMS Attribute. The command definition is the same as for a Modify.
Option U=Update Object
Use option U if you will not be creating a new version of the table from source. Instead, MDRapid will perform a CRTDUPOBJ of the live version to the temporary MDRapid library and copy the data to it.
Prerequisites for using Option U
- You have authority to MDSEC Function Code 30 for the target Promotion Level
Example Use Cases for Option U
- Alter a table to add partitioning to it
- Run a CHGPF command to change something about it
- Make no alterations to the object, but be able to purge deleted records with minimal downtime by copying the active records to the copy of the table.
Completing the Object Request
- Enter option M, R or U
- Enter the name of the Table or Physical File. You can enter the system name or Press F2 to enter the SQL long name.
- Enter the Attribute or press F4 to select from a list. The attribute will typically be PF or SQLTAB, depending on if it is generated from DDS or DDL.
- Press Enter
- If the option was for M=Modify, you will be prompted for the location to copy the source from and copy the source to for editing. For version control reasons, the source cannot be edited directly in the target library/folder, so a copy is made. Set the values and Press Enter. Afterwards, the source can be edited within the Object Manager by using option S.
Create Object-Specific Update Commands
If the Object was requested with option U=Update, and something about the table should be altered, then the command to execute for the alteration needs to be defined for the Object Request.
Steps:
- Use option C=Commands for Object in the Object Manger for the Object Request
- Press F6 to create a command
- Set Type = U for Update Object
- Set Reuse Command = N
- The default values for the other parameters are typically fine as is
- Enter the command that will be executed. Use the ++OBJLIB++ or ##OBJLIB## wildcard to qualify the object rather than a fixed library value, since the command will be executed for the table in a temporary library.
Example command for adding hash partitioning:
RUNSQL SQL('ALTER TABLE ++OBJLIB++.VBFA ADD PARTITION BY HASH (VBELV) INTO
10 PARTITIONS') COMMIT(*NONE)
Example command for adding range partitioning:
ALTER TABLE ++OBJLIB++.DATETABLE ADD PARTITION BY RANGE (ADATE)
(STARTING('2000-01-01') ENDING('2024-01-01') EVERY(1 YEARS))
Example command for changing a physical file:
Force MDRapid On/Off for Object Request
If the object request was for Modify or Recompile, MDRapid will automatically be used if the current number of records in the table meet or exceed the minimum defined for the MDRapid Usage Template.
If the object request was for Update, MDRapid is not used by default.
To override the default, use option 2=Edit on the Object Request.
Position the cursor to parameter Use MDRapid.
*DEFAULT – MDRapid usage based on record count for modify/recompile or not at all for update
*YES – MDRapid will explicitly be used
*NO – MDRapid will explicitly not be used
Set Unique Keys or Special Column Result Values
MDRapid relies on MDTransform to copy the data from the live version to the new version of a table. MDTransform has the ability to transform values for new or existing tables, leveraging all of the capabilities of SQL. This helps you avoid having to write a program or script to run after a file is deployed, saving you development time and application downtime.
Additionally, if using MDRapid to add partitioning to a table, MDRapid needs to know the set of columns that combine to uniquely identify each row in the table.
To manage the MDTransform definition for a table, use option F=File Data Transformation on the object request.
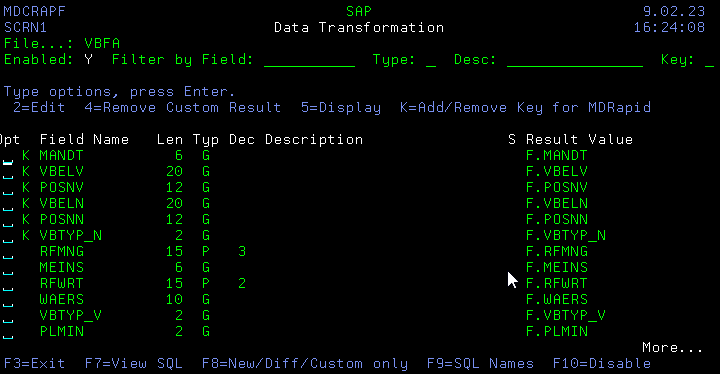
When you first invoke this option, MDTransform will check the table for a primary key constraint, unique key constraint or directly defined unique access path. If one of those exists, it will pre-designate the columns that combine to uniquely identify a row in the table.
Use option K to add or to remove a column from the group. If not using MDRapid to add partitioning, keys are not required, but they are recommended to reduce disk utilization during the copy and sync process.
Use option 2=Edit to define a custom result value for a column for each row that will be copied/synced. Use the same syntax that you would use in an SQL SELECT statement. The value can include function calls. If MDTransform complains during the validation phase that the SQL is invalid, you can press F7 from this screen to see the full INSERT/SELECT statement and test it in an SQL session.
Use option 4=Remove Custom Result to reset a result value back to the default.
Handling Generated Always Columns
If your SQL Table contains the Generated Always clause for Temporal Table columns, please consult the following table:
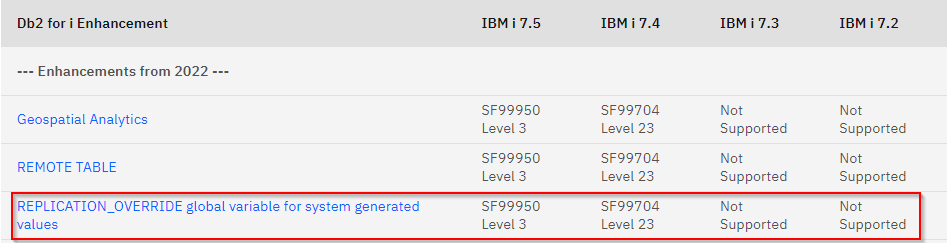
If your operating system has not reached the necessary minimum version or level, SQL cannot be used to copy the data to the new version and MDTransform/MDRapid will be disabled by default. This does not apply to identity columns – those can be overridden in older releases too.
You can override this by pressing F10=Enable from the File Transformation screen. In this case MDRapid will copy the rows, but the Generated Always columns will receive new values.
If your operating system has reached the minimum version and level, MDTransform/MDRapid recognize this and will remain enabled, because they can copy the old values to the new version of the table, as long as the following prerequisites are met:
- You are using MDCMS version 8.5 or newer
- QIBM_DB_GENCOL_OVERRIDE Function Usage is allowed either by default or for the user defined on the job description for the target promotion level. You can check this with command:
Submit the RFP for Validation
Once all Object Requests are ready, press F7=Submit RFP from the Object Manager.
This will bring up the RFP Manager in Submit mode.
From here, use option 1 to submit the RFP.
If there are any database relations over the requested tables (logical files, indexes, views) that have not already been requested for the same RFP, they will be listed at this time. Include them in the RFP by using option R=Recompile if they should be recreated from source or by using option U=Update to create them into the temporary library as a duplicate from the live library.
Then, a confirmation screen will be displayed for submitting the validation job to batch. This can be scheduled for starting at a later date/time or you can press Enter to immediately begin validation of the RFP’s objects.
The job will be submitted to the job queue defined for the job description that is applied to the target Promotion Level.
If any errors occur during validation, a message will be sent to your message queue. Full diagnostic information is available by using option L=Log on the RFP.
Launch MDRapid
If the Promotion Level is defined to auto-launch MDRapid, it will begin as soon as the validation phase is complete.
If not, it can be manually launched by pressing F9 from within the RFP Manager to toggle to Launch/Install mode. Then, use option 1 to submit the launch.
The following confirmation screen will be displayed:
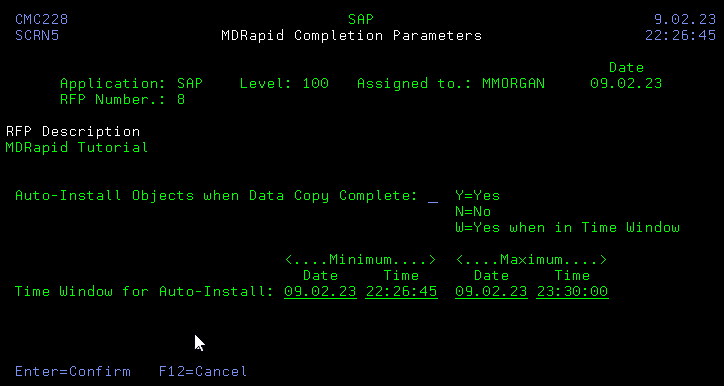
Auto-Install Objects when Data Copy Complete
Y – once all data copying and syncing is complete, immediately disrupt the target application by moving the new version of the tables to the target library.
N – continue syncing changes to the new version of the tables until a user manually decides to install the changes.
W – Yes when in Time Window – Enter the Minimum and Maximum Date and Time of the window. If MDRapid finishes copying prior to the minimum, it will sync until then and then begin the install. If MDRapid requires more time than the maximum for the window, a user must manually decide when to install the changes.
The MDRapid Console
From within the RFP Manager, option D=MDRapid Console for RFP can be used to view and manage the progress of the copy of data and transaction syncing for each table in the RFP.
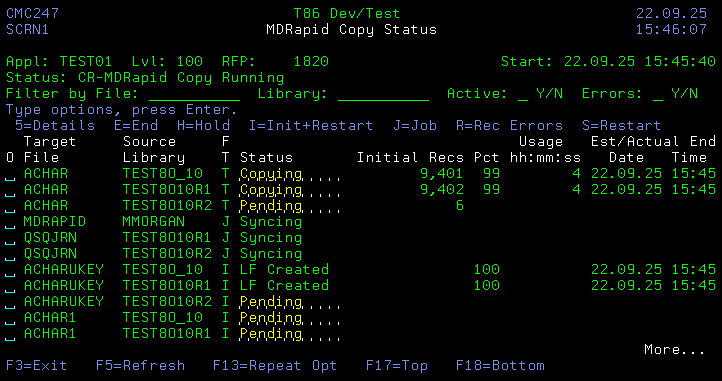
The console screen lists all filles that are utilizing MDRapid to copy across data from the live version of the fille. It also lists the indexes and views that are based on the files.
The list can be filtered by the following fields:
File
Enter a value to limit the listing to only those file system names that contain the filter value. For example, if BF were to be entered above, only VBFA would be listed.
Library
Enter a value to limit the listing to only those library system names that contain the filter value. For example, if R3 were to be entered above, only files in Source Library R3SD4DATA would be listed.
Active
Y – only list a file if a copy or syncing job is actively running for it
N – only list a file if a copy or syncing job is not actively running for it
Errors
Y – only list a file if it is in an Error state
N – only list a file if it is not in an Error state
Console Options
5=Details – View detailed processing and error information
E=End – End the MDRapid Copy/Sync or Monitor job
H=Hold – Hold the MDRapid Copy/Sync or Monitor job. The job will continue running but won’t perform any intensive processing until the job is restarted.
I=Init+Restart – Clear any records copied so far and restart the MDRapid Copy/Sync job from the very beginning.
J=Job – perform a WRKJOB for the job responsible for the row in the list.
R=Rec Errors – view a list of any record-level errors that are currently present for the table. When errors are present, this option can also be used to tell MDRapid to ignore the errors, so the installation will be allowed to proceed in spite of the errors.
S=Restart – either release a held job or restart the MDRapid job from the point where the prior job had left off.
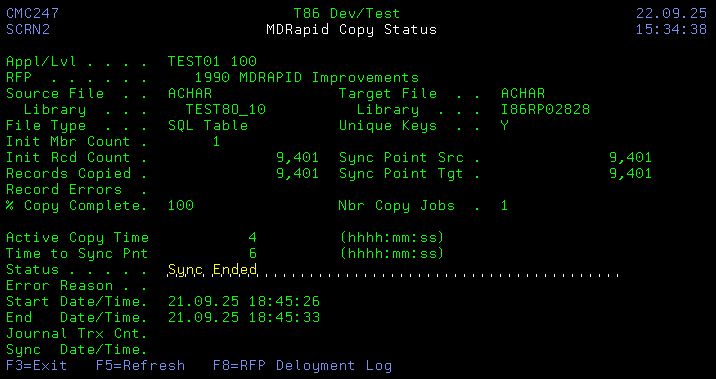
Console Detail View for a Table
Source File/Library
The Application Library and System File name that data is being copied from
Target File/Library
The Application Library and System File name that data is being copied to
File Type
Index – An SQL Index
Logical – A DDS logical file
Monitor – the MDRapid Monitoring job
Physical – A DDS physical file
Table – An SQL Table
View – An SQL View
Unique Keys
Y – columns have been defined to uniquely identify each record – syncing will be faster and multiple copy jobs can be used to make copying faster as well.
N – the copy and syncing will be by relative record number. Only 1 copy job (+ 1 monitor job) will be used and syncing will be slower.
Init Mbr Count
The number of members or partitions that the Source File contained when the bundle phase for the RFP was performed.
Init Rcd Count
The total number of non-deleted records across all members or partitions that the Source File contained when the bundle phase for the RFP was performed.
Records Copied
The number of records that have been copied from the Source File to the Target File during the copy phase of the MDRapid job.
Sync Point Cnt Source
The total number of records in the Source File during the most recent Sync Point.
A sync point is reached when all records have been copied and all journal transactions have been
processed.
Sync Point Cnt Target
The total number of records in the Target File during the most recent Sync Point.
A sync point is reached when all records have been copied and all journal transactions have been processed.
If the number of records in the Source File don’t match the number of records in the Target File, the table is considered to be in error and an installation will be blocked unless you use option R=Rec Errors and then press F10 to allow record errors to be ignored.
Ignoring record errors is only recommended if the reason has been analyzed and accepted due to the nature of what was modified in the new version of the table.
Record Errors
The total number of records that are in error. This occurs if an insert, update or delete fails.
If the number of record errors > 0, the table is considered to be in error and an installation will be blocked unless you use option R=Rec Errors and then press F10 to allow record errors to be ignored.
Ignoring record errors is only recommended if the reason has been analyzed and accepted due to the nature of what was modified in the new version of the table.
NOTE: a common reason record errors will occur is if there is a unique constraint on the table or a unique access path over the table. While MDRapid is copying data from the Source File, the application may be busy deleting and updating records and those transactions won’t be completely reflected in the target file until the sync process is reached a Sync Point. Normally, record errors that occur because of this will disappear once the Sync Point is reached, so you don’t have to worry about them. However, if there are still record errors when a value for the Sync Point Cnt is displayed, then there is a serious situation that will need to be analyzed.
% Copy Complete
The percentage of records that have been copied, based on the initial record count for the Source File. Once the copy process is complete, the percentage will be set to 99%. Once a Sync Point is reached, the percentage will be set to 100%.
Nbr Copy Jobs
The number of copy jobs (not counting the monitor job) used to copy records from the live version of the file to the new version of the file.
Active Copy Time
The amount of time that has elapsed for the copy phase of the MDRapid job. The amount is in the format of hours:minutes:seconds. Time is accrued only when the copy job(s) are active. When held or ended, the copy time remains frozen.
Time to Sync Pnt
The amount of time used after the copy was complete until all journal transactions were synced so that the MDRapid job could go into Sync/Idle state for the first time and wait for installation.
The amount is in the format of hours:minutes:seconds.
Status
The status of the job. See the table on the next page for descriptions of the status values.
Error Reason
A summary description of the technical reason why job processing failed. For further details, use option J=Job for the entry to view the job log.
Start Date/Time
The date and time that the copy phase began for a table or creation began for a logical file.
End Date/Time
The date and time that the copy phase finished for a table or creation finished for a logical file.
If the copy phase for a table is still in progress, the End Date/Time is an estimate of when the copy phase will be complete. This estimate is recalculated after each block of 10,000 records are copied.
Journal Trx Cnt
The number of journal transactions that have been processed during the Sync phase of the MDRapid job for the specific table.
Sync Date/Time
The date and time of the most recent journal transaction that the MDRapid job has processed.
Job Status Values
- Pending - the file hasn’t begun processing yet
- Job Queue - the MDRapid job has been submitted to the job queue
- Resetting - a reset to Copy Pending has been requested for the RFP
- Reset - a reset to Copy Pending has completed for the RFP
- Launch Err - error occurred trying to submit the launch of the file for MDRapid processing
- Copying - the current data in the origin file is being copied to the new version of the file
- Copying/RE - The current data in the origin file is being copied to the new version of the file, and one or more of the records failed to be copied. Use option R for more details. The errors may potentially be automatically resolved during the sync process.
- Copy Held - a user has held the copy job
- Copy Ended - the copy job has ended without reaching completion
- Copy Error - Error occurred during the copy of data
- Copy Resume - a user has requested that a copy job resume processing
- LF Building - a logical file is in the process of getting built over its physical file(s)
- LF Built - A logical file has finished the build process
- LF Error - error occurred during the logical file build
- Syncing - the copy process is complete and outstanding Journal transactions are in the process of being synced to the new version of the file
- Syncing/RE - the copy process is complete and outstanding Journal transactions are in the process of being synced to the new version of the file and one or more of the records failed to be copied. Use option R for more details.
- Sync/Idle - all copying and transaction syncing is complete, will continue to sync new transactions as they occur
- Sync/IdleRE - all copying and transaction syncing is complete, will continue to sync new transactions as they occur and one or more of the records failed to be copied. Use option R for more details.
- Sync Held - a user has held the sync job
- Sync Ended - the sync job has ended without reaching completion
- Sync Error - error occurred during the sync of journal transactions
- Sync Resume - a user has requested that a sync job resume processing
- Finish Pending - the RFP install job has requested the sync job to finish any outstanding transactions and then end so that the deployment of the files can occur.
- Sync Comp - the job for the file has completed so that the installation can proceed
- Running - the monitor job is actively observing the individual file jobs
- Monitor Held - a user has held the monitor job
- Monitor Ended - the monitor job has ended
- Monitor Error - error occurred in the monitor job
- Monitor Resume - a user has requested that the monitor job should resume processing
Console Detail View for a Journal Tracking Job
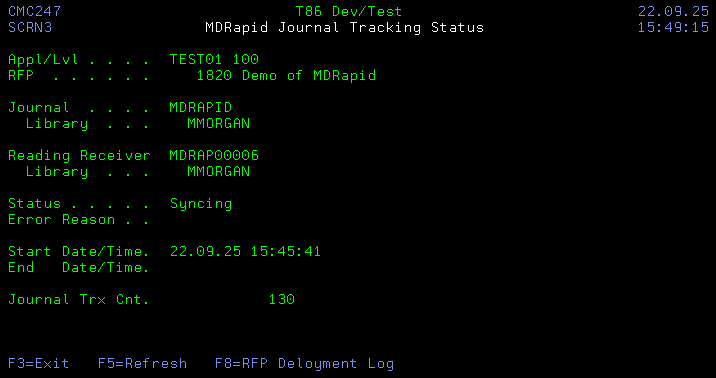
Journal/Library
The Name and Library of a Journal that records transactions for one or more tables in the RFP.
Reading Receiver/Library
The Journal Receiver currently being read by the Journal Tracking Job. Any receivers older than the one displayed may be deleted.
Status
- Pending - the job hasn’t started yet
- Job Queue - the MDRapid job has been submitted to the job queue
- Syncing - the transactions are actively being read from the journal and written to the data queues for the impacted tables.
- Sync Held - a user has held the tracking job
- Sync Ended - the tracking job has ended
- Sync Error - error occurred in the tracking job. Further details available in the RFP Deployment log
Error Reason
A summary description of the technical reason why job processing failed.
Start Date/Time
The date and time that the job most recently started.
End Date/Time
The date and time that the job most recently ended.
Journal Trx Cnt
The number of journal transactions that have been processed across all impacted tables by the job.
Deploy Table Changes
Once all of the table records have been copied and all journal transactions are synced, the RFP can be installed. If the choice was to auto-install, then this step will occur without a user action being necessary. However, if a manual install is required, take the following steps:
- Command MDCMS from a command line
- Option 3=RFP Manager
- If the RFP in question is not listed, adjust the filter values and also use the F9 key to toggle to install mode.
- If the Status of the RFP is currently 03 (Ready to Install), use option 1=Install to bring up the confirmation screen.
- Set the date and time to install, if it should not occur immediately, and then press Enter.
Completely Reset MDRapid
If the install step has not occurred yet and you would like to reset the MDRapid processing for all requested tables and logical files for an RFP, take the following steps:
- Command MDCMS from a command line
- Option 3=RFP Manager
- If the RFP in question is not listed, adjust the filter values and also use the F9 key to toggle between install mode and manage mode.
- If the Status of the RFP is currently 03 (Ready to Install) or CR (MDRapid Copy Running), use option 7=Reset to end the MDRapid jobs, delete the temporary MDRapid libraries and reset the RFP to status CP (MDRapid Copy Pending)
If the decision is made that the RFP should never be used, repeat option 7=Reset until the status is 00 (Empty) and then use option 9=Close to close the RFP.
Optional Cleanup after MDRapid Deployment is Complete
Delete Backup Libraries
By default, the backup libraries for the tables that were replaced are retained on the system for a minimum of 3 days and won’t be automatically deleted unless the MDCLEAN job runs after the 3 days have passed.
However, to recover disk space more quickly, once any validation has shown that the prior version of the data and objects are no longer necessary, The libraries can be deleted.
By default, the name of these libraries will begin with MDU. The actual name(s) used can be viewed from the RFP Deployment Log for the RFP number that was used for the deployment. Completed RFPs are viewable from the MDCMS Main Menu option 4 – RFP History.
Reclaim *BASE Memory
If the subsystem used by MDRapid was configured to used a separate memory pool, then the memory will continue to be allocated only for that subsystem until such time that the subsystem is deleted or the configuration is modified.
If you will not be performing another MDRapid deployment in the near future, you can release this memory back to *BASE with the CHGSBSD command.
Example CHGSBSD command for remove from separate shared pool:
Uninstall MDRapid
If MDRapid is only being used for a short-term project, the following components can be removed from the partition when finished:
Libraries
- MDCMS
- MDREP
- MDSEC
- MDXREF
IFS Folder
- /MDCMS
QGPL Objects
- MDCMS
- MDREP
- MDSEC
- MDXREF
User Profile
- MDOWNER
And any subsystems and job queues created for use only by MDRapid can be deleted as well.