MDOpen User Express Help
This is the MDOpen User Express Help for Change and Distribution Management from Midrange Dynamics. This reference document is intended for developers using MDOpen within VSCode.
Last Published: October 13, 2026
You can download a PDF version of this guide here.
This guide is comprised of these sections:
- MDOpen User Express Help
- MDOpen Overview
- Starting MDOpen
- Create an Object Request
- Complete New Object Request
- Migrate objects from a delivered library
- Delete an Object Request
-
- Remove Objects from RFP
- Object Creation
- Submit RFP for Installation
- RFP Approval
- RFP Installation
- Send RFP to Target System
- Merge RFPs for Sending
- Send RFPs to Target System
- Schedule Install on Target System
- View RFP Send History
- RFP Rollback
- Work with Logs
- Work with Spoolfiles
- Work with Messages
- Work with Job Log
MDOpen Overview
MDOpen is an extension through VSCode used for multiplatform development for MDChange (MDCMS). Additional configuration steps pertaining to the core MDCMS product are outlined in the MDCMS Admin and User Guides and will not be covered within this manual.
The life cycle for object modification/distribution is as follows:
- The objects are requested for modification from the application's test or production environment. The source code is then copied to the programmer's library.
- The modifications are made to the source code within the programmer's library.
Or
- The objects are requested for migration from a delivered library.
- Any modifications are made within the delivered library.
- MDCMS compiles the source code and installs the source code/objects into the test environment. The prior source code or objects are archived.
- If higher-level environments exist on the system, the modification requests are automatically generated.
- Once testing is complete, the source code and/or objects are installed into the next environment.
- If working with multiple iSeries machines or partitions, the modification package can be distributed to those systems.
- The modification package is received on the remote system and installed into the application environments.
For instructions on installing MDOpen for VSCode or managing settings and connections, refer to the following documentation:
Installation Instructions
Manage MDOpen Connections
MDOpen Settings
Active Connection Panel
Starting MDOpen
- From a VSCode click the MD extension on the left navigation bar. Click on the MDOpen Active Connection to connect to the correct instance.
Create an Object Request
There are multiple ways to request an object. Depending on the workflow and situation, choose the path that is best for the situation.
Begin Object Request from MDXRef
- Select MDXREF Objects form the left navigation tree.
- Click
 at the top of the MDXREF - Objects page. The Adjust filter for MDXREF - Objects screen will appear.
 -
Input any of the following information to narrow the search for the object and press Enter or Refresh List.
- Object Name
- Library
- Object Type
- Attribute
- Description
- SQL Name
- SQL Type
- Application
- Level
- Source Content
-
Click
 next to the correct object to open the New Object Request screen. Continue with steps in Complete New Object Request.
Begin Object Request from Projects
- Click Projects from the navigation tree.
- Click the
 next to the appropriate Project to open the New Object Request screen. Continue with steps in Complete New Object Request.
Begin Object Request from Tasks
- Click Tasks from the navigation tree.
- Click the next to the appropriate Task to open to the New Object Request screen. Continue with steps in Complete New Object Request.
Complete New Object Request
- The New Object Request screen will default to the last Application, Level, Project, Task, Subtask and RFP that was worked.
Note: The Application and Level are required fields. The Project, Task, Subtask, and RFP fields are required by the configurations set in the Developer Library Naming Template. All other fields are optional. - Ensure the object request is tied to the correct tracking information with one of the following methods:
- Manually input the Application, Level, Project, Task, Subtask and RFP
- Select the appropriate information using the
 next to the field(s).
 - Click the to create a new Project, Task, Subtask or RFP to be used for the object request.
- From Level can be used to override the from library on an object.
- Click Next. The second page of the New Object Request will be received.
- Input the Object name or select the object from the elipse.
- MD Attribute can be input, but this field is optional. MDCMS will select the last used attribute for the object from MDXREF.
Note: If the new object screen was accessed from the MDXREF-Objects screen the Request Objects screen will be received instead of the second New Object Request screen. - Click Next to receive the Request Objects screen.
- Select one of the following options:
- Modify
- Recompile
- Delete
- Update
- Click Process Selections
- If required, the Objects Pre-Request Warnings will be received. Resolve as needed.
- To view and/or work with the Object Request, click Active Object Requests from the navigation tree and click
 next to the object request to be modified.
 -
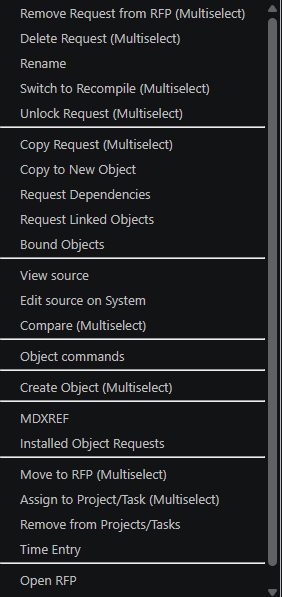
Click the
to receive a menu with multiple available actions to take on the object request. Use the  next to the object requests to select multiple objects at once for the actions labeled (Multiselect).
-
Click the
 next to the object to create the object after the modifications are complete.
 Note: An Object Request may be performed without a Project, Task or Subtask value. However, an Installation is not allowed until every Object is assigned to a Project, Task or Subtask.
Migrate objects from a delivered library
If objects and/or source are delivered to your system from a vendor, and they require that they be deployed to your production application, those objects and/or source may be quickly requested for migration.
Import Object Library
- Click Import Object Library from navigation tree. The New Object Request screen will open.
- The Application, Level, Project, Task and RFP will default to the last used. Update as neeeded.
- Click the elipse next to Import from Library to select library to import or type the library name in the field.
- Click Next
- Select objects to migrate using the beside each object or select the beside the Migrate header to select all objects.
- Click Process Selections
- Status will change to 'Requested for Migration' for all objects selected. Once all objects are selected they will be added to the RFP.
Import Source Library
- Click Import Source Library from navigation tree. The New Object Request screen will open.
- The Application, Level, Project, Task and RFP will default to the last used. Update as neeeded.
- Click the elipse next to Import from Library to select library to import or type the library name in the field.
- Click Next
- Select source objects to migrate using the beside each object or select the beside the Migrate header to select all objects.
- Click Process Selections
- Status will change to 'Requested for Migration' for all source objects selected. Once all objects are selected they will be added to the RFP.
Delete an Object Request
- Click Active Object Request from the navigation tree.
- Click to filter the object(s) by any combination of filter options.
- Click next to the object(s) to select the object requests to be canceled.
- Click next to an object that was chosen and select Delete Request.
- The Delete Requests screen will be received with the available delete options for the object(s) selected. Click under the appropriate delete action for the object(s) if required. Click Process Selections.
Request for Promotion (RFP)
Before requested objects can be promoted to the next level, the objects must be assigned to an RFP (request for promotion). The RFP is a number used to identify the promotion package and is used only once on a system. The Objects Requests screen shows the RFP number next to each object request. If the RFP is 0, then the object is not yet assigned to an RFP. Otherwise, the object is assigned, and the assigned RFP number is displayed. There is no limit to the number of objects in an RFP. The only restriction is that all the objects must exist in the same ASP (Auxiliary Storage Pool).
Create new RFP
RFPs can be created in multiple ways, providing flexibility in when and how objects are assigned for promotion.
Create New RFP from Active Object Request screen
If there was not an RFP assigned to the object request during creation. The RFP number will show as zero on the Object Request screen.
1. Click on Active Object Request in the navigation tree. 2. Click on the zero next to the object to be assigned to an RFP. The Assign to RFP screen will appear.
3. Click New RFP. The RFP Detail screen will appear. Continue with steps in RFP Detail.
Create New RFP during Object Request creation
A new RFP can be created during the creation of a new Object Request.
- On the New Object Request screen, click the next to the RFP field. The RFP Detail screen will open. Complete instructions in RFP Detail.
Create New RFP from Active RFPs screen
A new empty RFP can be created from the Active RFPs screen. Once the RFP is created, new object requests can be created directly from the new RFP by clicking or by clicking the and selecting New Object Request.
- Click Active RFPs from the navigation tree.
- Click New RFP. The RFP Detail screen will appear. Continue with steps in RFP Detail.
RFP Detail
- The Application, Level and User will auto populate. This information can be updated by typing in manuall or clicking on the and selecting new information.
- Input all required RFP information on the RFP Details screen.
- The options to delete source and object from either Developer library or Import library can be selected by checking the next to these options.
- The RFP will default to Create Requests for next level, which will create the object requests on the RFP at the next level when the RFP is installation is complete. Uncheck this to not automatically create the next level requests.
- Click Save. The Assign RFPs screen will appear with the new RFP listed.
- If the RFP was created from the Object Request screen, click the new RFP number to assign the object request.
Include Related Objects in RFP
If the MDXREF database has been created for the application, some or all related objects can be requested to be included in installation. For example, if a physical file is modified, all logical files and programs that use the physical file may be requested for modification or recompilation. Or, if the parameters for a program are modified, all programs, commands, menus, etc. that call the program may also be requested for modification.
- Click Active RFPs from the navigation tree.
- Click
 next to the RFP number to view all active objects in the RFP.
 - Click next to the object that need related objects requested.
- Click Request Dependencies or Request Linked Objects.
- Click next to the dependent Object(s) to include in the RFP. Click Process Selections.
Remove Objects from RFP
- Click Active RFPs from the navigation tree.
- Click next to the RFP number to view all active objects in the RFP.
- Click next to the individual object(s) to remove, or next to "select all" to select every object in the RFP.
- Click next to an object that was chosen and select Remove Request from RFP.
- The screen will refresh and the object(s) will no longer appear in the RFP. This action does not delete the object request.
Object Creation
Object Creation can be completed at the individual object level. Otherwise, the object creation will be done for all objects in an RFP when the RFP is submitted.
- Navigate to the Object Request screen from either Active Objects Requests in the navigation tree or clicking the on the Active RFPs screen.
- Click next to the object to create. The Create Objects screen will appear with messaging if the object created successfully or if there were create errors.
- The Create Status will show either 'Created' or 'Error'. Click the Create status to view the Spooled file directly.
- To view the entire job log, click Job Log at the top of the Create Objects screen.
- To navigate to all spooled files, click Job Spooled files at the top of the Create Objects screen. Select the Spooled file to view.
Submit RFP for Installation
- Click Active RFPs from navigation tree or by clicking on the RFP number from the Active Object Requests screen.
- Click
 next to the RFP.
 - If there are missing depdendencies for a file, a Warning screen will be received with all missing dependencies listed. Select the correct option for each dependency and click Process Selections.
- If the program and source dependencies should not be included in the RFP, if authority is set, the Continue button will be available to click without making any selections.
-
If an object request has been installed at the next level already, a warning screen will be received 'Objects already requested for Next Level'. The screen will list the object(s) and the RFP that exists in the next level. Select one of the following options before proceeding:
- Cancel - to cancel the RFP submission
- Continue and Auto-Merge using New Desc - this will continue with the RFP submission and automatically merge the contents of this RFP with the RFP that exists in the next level and use the RFP Description from this new RFP. The shared object will reference both project(s)/task(s) associated with the changes.
- Continue and Auto-Merge using Orig Desc - this will continue with the RFP submission and automatically merge the contents of this RFP with the RFP that exists in the next level and use the RFP Description from the RFP that already exists in the next level. The shared object will reference both project(s)/task(s) associated with the changes.
-
Continue without Auto-Merge - this will continue with the RFP submission and it will only merge the shared object into the existing RFP at the next level. The shared object will reference both project(s)/task(s) associated with the changes. All other contents of this RFP will be in a new RFP.
-
Retry Validation - this will retry the RFP validation if there is a change to the objects in the RFP for submission or the RFP in the next level.
- The Submit RFP screen will appear. The RFP Submission time will default to the current time. This can be updated to a later time if required. Verify the Job Queue and Job Queue library are correct. Click Confirm.
- If any compiles fail during submission an error message window will display with the job information and error reason. Continue with one of the following options to research the error:
- Click RFP to return to the Active RFPs screen
- Click Objects to go to the Active Objects screen
- Click Log to view the RFP Deployment log
- Click cancel to cancel out from the error message.
- Once the compile error(s) are corrected and the RFP is resubmitted, a message window will appear notating the compile and RFP completed successfully. If an approval is required before installation this will also be in the message. Continue to RFP approval steps.
RFP Approval
- Click Active RFPs in the navigation tree.
- The status for any RFP needing approval will show 'Waiting for Approval'.
- If the user has approval authority, click the
 to approve the RFP installation.
 - The Approve RFP confirmation screen will appear. Click Confirm.
- The RFP status will now show 'Waiting for Installation' if auto-installation is not configured. If auto-installation is configured the RFP will disappear from the Active RFPs screen and will show 'Installed' in the Installed RFPs screen.
RFP Installation
- Click Active RFPs in the navigation tree or by clicking on the RFP number from the Active Object Requests screen.
- The RFP status should be 'Waiting for Installation'.
- Click next to the RFP. The Install RFP screen will appear.
- Click Check Locks to check if there are any object locks prior to installation.
- Click Confirm to install the RFP immediately.
- Update the Scheduled Date and Scheduled time to schedule the RFP installation.
- A message window will be received with either an error message or successful completion message. Select one of the following options:
- Click RFP to return to the Active RFPs screen
- Click begin working with the Next RFP that was generated after the completed installation.
- Click Cancel to cancel out of the message window
- If the level is configured to send to a remote target, click RFP Targets to send the RFP.
Send RFP to Target System
The ability to send an RFP to a target system can be accessed by either the navigation tree or from the message window received when an RFP is successfully installed. The user must have the appropriate authority in MDSEC to send to target systems.
Merge RFPs for Sending
To avoid sending multiple RFPs to a target individually, a user has the option to merge all RFPs waiting in the Send Queue into one RFP. Merging RFPs in the send queue is the most efficient practice to prevent sending and installing RFPs out of order and helps keep installation downtime to a minimum.
1. Click RFP Send Listing under Distribution from the navigation tree. A listing of all RFPs waiting to be sent to remote targets will be received. 2. To merge multiple RFPs together before sending, click next to each RFP to merge. 3. Click and select Merge. The Merge RFP Send screen will be received. 4. The Description field will default to the description from the first RFP in the list. Update the description as needed. 5. Verify all RFPs listed are correct and click Merge. 6. The RFP Send Listing screen is received with only one RFP listed.
Send RFPs to Target System
- Click
 to select the target(s).
 - Click
 to ignore a specific target for an RFP.
 - Click
 to send the RFP to the target. A message window displaying the job will be displayed.
 - Another message window will be displayed with a successful message.
- Click RFP Targets on the message window to view the status and schedule the installation.
Schedule Install on Target System
- From the RFP Targets screen, click Schedule Install.
- Input the date and time for the installation and click Save.
View RFP Send History
- Click RFP Send History under Distribution in the navigation tree.
- The list of all sent RFPs will be received.
- Click to view objects, navigate to targets, Reopen the RFP or to view logs.
- Click to view the object requests associated with the RFP.
- Click to view the targets for the RFP.
RFP Rollback
Rolling back some or all of the objects in an RFP is only possible if archiving is activated for the application level.
The new RFP generated from this process will delete any new objects, restore any deleted objects, and return all modified objects to their previous versions.
The rollback can be performed directly on a target system if needed, or on the development system and sent to all target systems.
The additional steps for the Compile, Approval, Installation, Sending and Receiving of an RFP can be found above in this document.
Rollback by Object
Specific objects can be found through the Instaled RFPs or from the Installed Objects screen.
To select the object(s) by RFP: 1. Click Installed RFPs in the navigation tree. 2. Click next to the RFP to view all the objects installed with the RFP.
3. Click next one object to be rolled back.
Or
To select object(s) by Installed Object Requests:
- Click Installed Object Requests in the navigation tree.
- Click to filter to the object(s) to be rolled back.
- Click next one object to be rolled back.
- Click and select Rollback.
- Continue with steps in Complete Rollback Steps.
Rollback by RFP
- Click Installed RFPs in the navigation tree.
- Click next to the RFP to be rolled back.
- Continue with steps in Complete Rollback Steps.
Complete Rollback Steps
- The Select Objects for Rollback screen will be received with all objects that were installed under the RFP for the RFP or the object selected on the previous screen. The Description for the new RFP will be generated using the installed RPF Description, with the ROLLBACK added to the beginning.
- Click to select any additional objects to be rolled back or next to Select to choose all objects listed.
- Click Process Selections.
- The Select Objects for Rollback screen will appear with the previous object selections listed. Add additional objects if required or click Continue to confirm the selections.
- The Active RFPs screen will be received with the new Rollback RFP in Requests assigned status. Complete the remaining steps in Submit RFP for Installation.
Work with Logs
Multiple different logs can be accessed quickly from MDOpen under the Logs section in the navigation tree. The results from the logs can be viewed or exported.
Work with Spoolfiles
- Click Spoolfiles under Logs in the navigation tree.
- All Spoolfiles for the User will appear. Process one of the following to work with the Spoolfile:
- Click the Spoolfile Name to view.
- Click next to the spoolfile and select delete, Export or Display.
- Click
 to export the spooled file to the IFS, email or both.
Work with Messages
- Click Messages under Logs in the navigation tree.
- All messages will be listed.
- Click
 to receive the original prompt window that was received with the message. Use the options on the prompt window to navigate as needed.
Work with Job Log
- Click Job Log under Logs in the navigation tree.
- The current job log will display for review.